Setting up a home studio doesn’t have to be expensive, but it does require careful planning. You’ll need to find a quiet, small space away from household traffic and prioritize essential gear like a microphone, headphones, and a computer. Soundproofing and acoustic treatment can be cost-effective with DIY solutions, but knowing where to start can be tricky. Keep going, and you’ll discover how to create a professional sound without overspending.
Choosing the Right Space and Basic Equipment
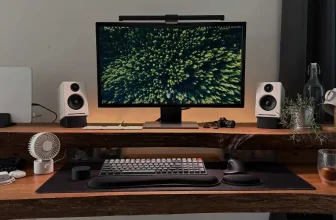
When selecting a space for your home studio, it’s important to find a quiet, low-traffic area that minimizes external noise and distractions. Look for a room with minimal outside foot traffic or street noise, ideally away from household common areas.
A smaller, enclosed space can help contain sound and reduce echoes. Keep in mind, the room should have enough space for your essential equipment, like a computer, audio interface, microphone, and speakers.
Natural light is a bonus but isn’t essential. Focus on a spot with stable power outlets and good ventilation.
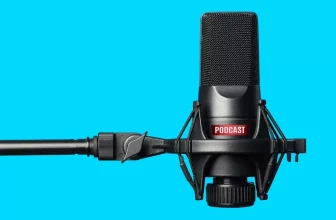
Once you’ve chosen the space, invest in basic gear like a decent microphone, headphones, and a reliable computer or laptop to get started without breaking the bank.
Soundproofing and Acoustic Treatment on a Budget
To improve the sound quality in your home studio without spending a lot, focus on simple, budget-friendly soundproofing and acoustic treatment techniques.
Start by sealing gaps around doors and windows with weatherstripping or draft stoppers to reduce noise leakage. Use heavy curtains or blankets over windows and walls to absorb sound reflections.
Place thick rugs or carpets on the floor to minimize bounce and echo. DIY acoustic panels made from inexpensive foam or even egg cartons can help dampen sound reflections—just position them at reflection points on your walls.
Rearranging furniture, like bookshelves filled with books, can also absorb sound. These small, strategic steps can significantly enhance your studio’s sound quality without breaking the bank.
Essential Gear and DIY Tips to Maximize Your Setup
Maximizing your home studio’s potential doesn’t require expensive equipment—strategic gear choices and DIY solutions can make a big difference.
Start with a good-quality microphone and headphones, which are crucial for clear recordings and accurate monitoring.
Instead of costly studio monitors, consider DIY acoustic panels made from foam or thick blankets to improve sound quality.
Use free or affordable software like Audacity or Cakewalk for editing and mixing.
Get creative with DIY stands or mounts using household items to optimize your space.
Keep cables organized to prevent noise and clutter.
Regularly experiment with placement and room arrangement to enhance acoustics.
With a little ingenuity and smart choices, you can create a professional-sounding setup without breaking the bank.
Conclusion
With some smart planning and creative solutions, you can set up a functional home studio without spending a fortune. Focus on choosing a quiet space, prioritize essential gear, and use DIY acoustic treatments to improve sound quality. Remember, a little effort and resourcefulness go a long way. Stay patient, experiment with different setups, and you’ll soon have a professional-sounding studio that fits your budget and your creative goals.
Trending Products